Objectives :
At the end of this short training course, you should be able to: :
- Create a Drupal module from start to finish, right up to deployment on Packagist.
- Perform a complete website integration from start to finish.
- Quickly create websites by integrating layouts.
- By the end, we will have created a kind of complete portfolio [a kind of one-page site]
Prerequisites: :
- Before starting this tutorial, it is important to have a basic understanding of how Drupal works:
- Have completed the entire tutorial for the following tasks:
- Creating blocks
- Creating content
- Knowing how to clear caches
- Mastering the region system with Drupal
- Have a Drupal site already installed and configured locally
- Have knowledge of how yml (or yaml) files work
- Know how to write html, css, js, php
- Savoir utiliser git
- Be comfortable with the command line
- Have minimal knowledge of the twig template engine
- Know how to use npm for managing javascript dependencies
- Know how to use composer for managing php dependencies
Good to know:
- We mainly work with a Linux distribution (install one if you don't have one).
- Here, we use a Debian-based distribution.
Part 1: Creating our first Drupal module
Basic concepts: :
- Module : a set of PHP, JS, and CSS files that extend a site's functionality and add new features.
- Block : part of a website's layout that can be created, deleted, and ordered at will by the user.
- Plugins : all of a block's features that can be interchanged.
Creating our module:
- You can use drush to generate and configure it as follows [only for experienced users]
To do this, navigate to the /public folder of our Drupal site.
cd /siteweb/mon_site/public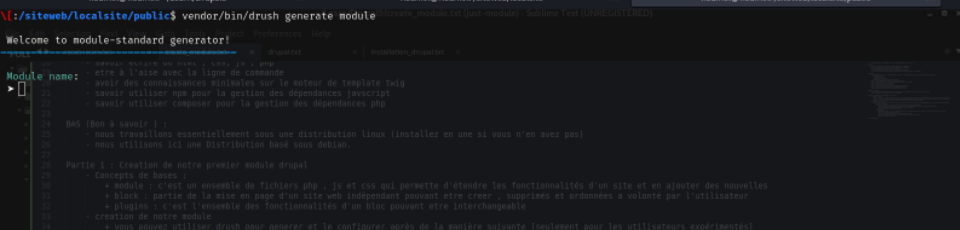
This command will launch a website that will ask you a series of questions to create your module.
NB: This method is not recommended for beginners.
We will create our module manually.
- important :
- To avoid cluttering up the hierarchy of our work, we will use the /siteweb/ folder
- located at the root of our computer.
- This folder will contain all our websites and modules.
- This is to ensure the code is well structured and easy to find.
We will use hand-coding to create our module.
- The first step is to go to the modules folder:
cd mon_site/public/web/modules/custom/- In this folder, create a folder with the name of your future module (be sure to follow the naming convention for your modules).
mkdir module_unWe sail inland
cd module_unWe create our first file module_one.info.yml (it is important that the names of the module's base files all have the same name).
touch module_un.info.ymlIn this file, we will insert the following code:
name: module_un
description: First Custom Drupal 9 Module (Description du module qui sera affiché)
package: Custom  (Déclarer qu'il s'agit d'un module personnalisé)
type: module (Déclarer qu'il s'agit d'un module )
version: 1.0  (Version du module)
core: 8.x  (La version de Drupal)
core_version_requierement: ^8 || ^9 (les version de drupal supporter par votre module)
dependencies: (le module parent duquel dépend votre module )
   - formatage_models
name : corresponds to the name of your module; this is the name that Drupal will use in its configuration
type : the type of element you are creating here; this will be module
description : a short text explaining what your module does
core : for the default version of Drupal to which your module will be attached
core_version_requirement : the versions of Drupal supported by your module
dependencies : the parent module on which your module depends
NB : since this is a business-oriented tutorial, make sure that the formatages_models module is already installed
on your Drupal site, because without it your module will not work
Second steps in creating the module
It is true that at this stage we can install our modules and use them, but they still contain nothing, so we will continue with our tutorial.
Before moving on to the installation step,
- create the composer.json file and install the dependencies:
- Here too, we have two options:
- either we create our composer file manually
- or we type composer init at the root of our module
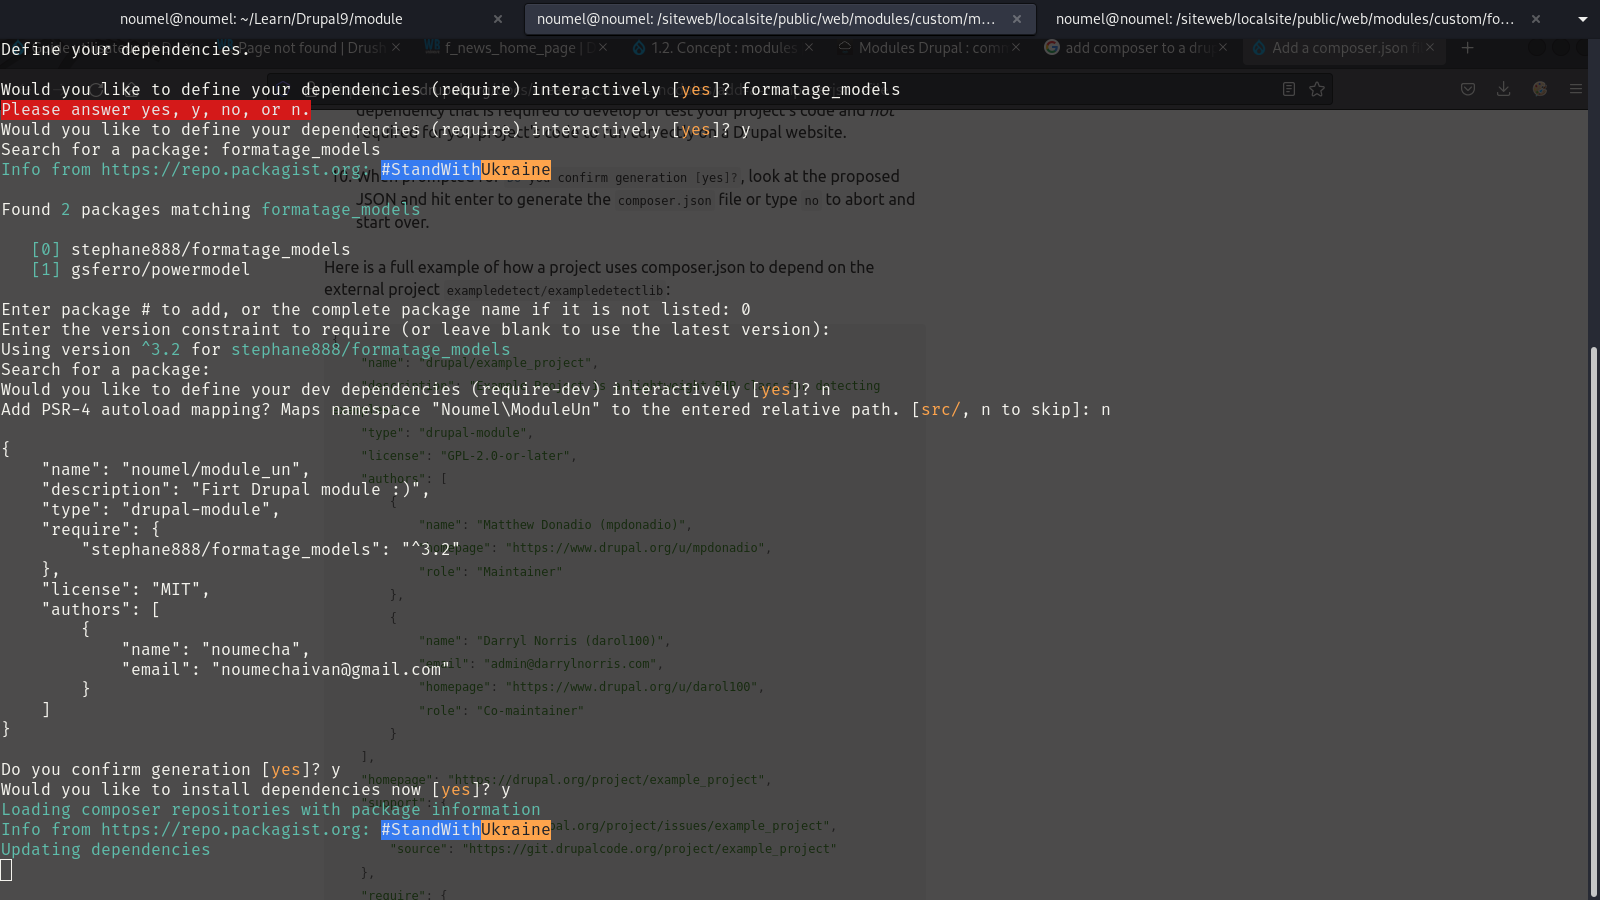
We will choose option 2 (I know you will tell me that it is not recommended :) )
but here we are dealing with a composer file (remember that you need to have some knowledge of composer to be able to follow this tutorial).
So we'll type composer init in our module_un folder:
you'll see in this screenshot what I entered at my level; it's up to you to configure it at your level according to your preferences.
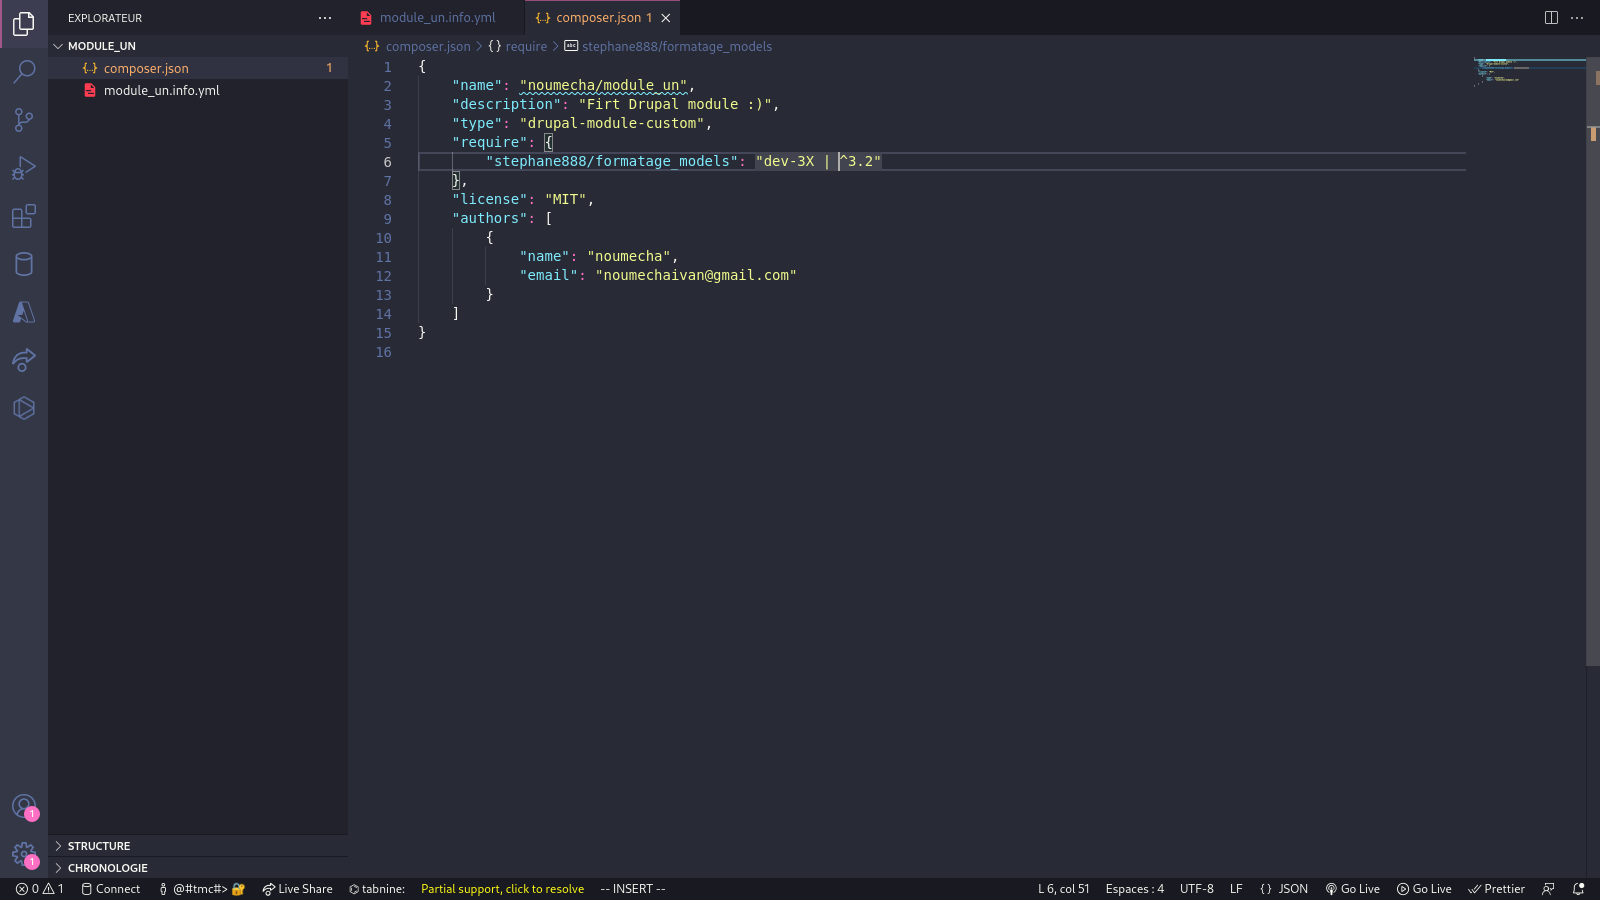

At the end, you will need to modify the files as I did in terms of:
- package_name : his is important because it is the name that will be used to install our module via packagist.org
- require with formatages_models
This is important for choosing the right version to use: here we have “dev-3x | ^3.x”
We ask it to use the dev-3x version by default and any version higher than 3.x
It's clear that it's not very complicated. Composer helps us create a composer.json file by asking us a few simple questions.
With these two files already created, we can now install our module on our Drupal site and use it [well, it's true that it doesn't do anything at the moment], but it's always better to see it, so let's go ahead.
Installing our module via drush:
- we type the commands (being located at this level: /website/my_site/public/):
vendor/bin/drush en module_un -y
Drush will search for our module and activate it on our website.
After that, we clear the cache via: /vendor/bin/drush cr
Then, ta-da! Our module is available by going to the graphical interface of our website: extends (for English versions) and modules (for French versions).
We can see the name of our module, the dependencies, and the description that we entered at the beginning in module_un.info.yml
There are too many dependencies, even though we only installed one :( :
This is normal, since formatages_models also comes with its dependencies, which is why we have so many.
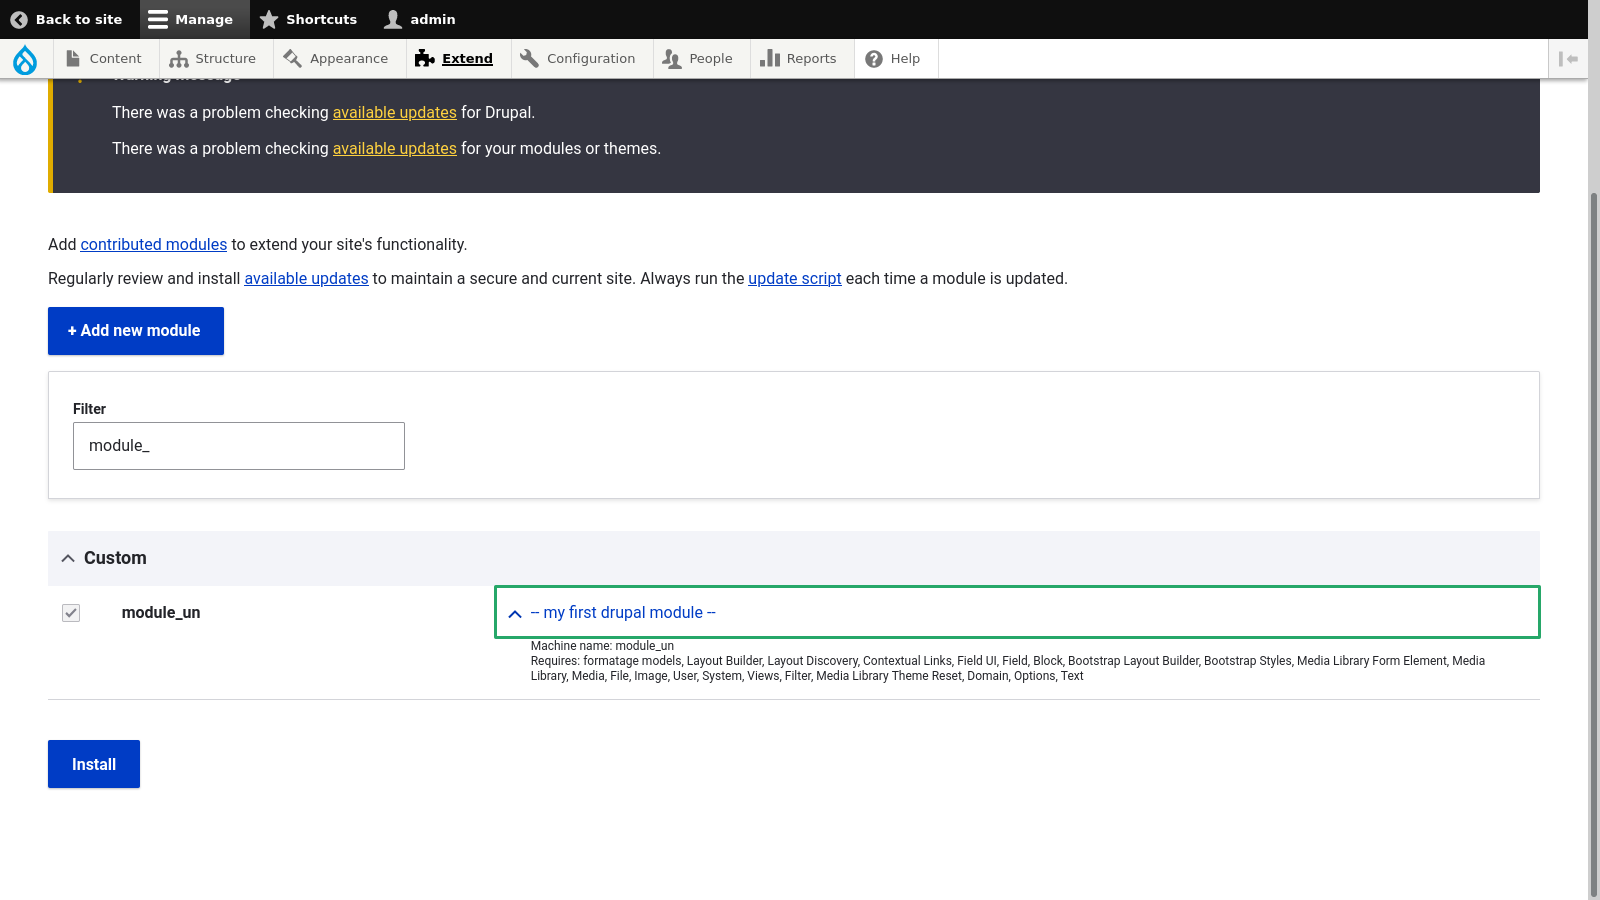
Congratulations, you have just created your first Drupal module :)
NB: I recommend that you create a GitHub repository for your module now to facilitate updates via packagist.org.
Visit this link for more information : https://packagist.org/
Part 2: Structuring our module tree for integration
- Tree structure :
-We will use the following tree structure for all our future modules:
|module_un/
|--css/ : will contain all our future CSS files for the design of our layouts
|--js/ : for adding js to our layouts
|--icons/ : will contain icons to easily recognize the display of our layouts
|--layouts/ : will contain the .html.twig files that will contain the structure of our layouts
|--|--sections/
|--|--teasers/
|--|--menus/
|--|--pages/
|--src/ : contains the PHP files needed for our layouts, forms, and other elements.
|--|--Plugins/
|--|--|--Layout/ : contains the PHP files used to create layouts.
|--|--|--|--Sections/
|--|--|--|--|--Menus/
|--|--|--|--Teasers/
|--vendor/(automatically created by Composer when installing dependencies)
|--module_un.info.yml
|--module_un.liraries.yml : pfor configuring our future libraries that will be used to call our CSS and JS files
|--composer.json
We will therefore create this tree structure while leaving the existing files in place :)
For the next step, I recommend that you already have some HTML, CSS, and JS code prepared, which will help you to integrate easily and already have a certain visual logic
for the section you are going to integrate.
Here in our example, we will create a simple portfolio site with:
- a hero section
- a footer
- a section to present skills
- another section for the description and more, depending on your understanding of the tutorial
I will create a GitHub repository so that you can access the HTML and Sass (CSS preprocessor) code.
Part 3: our first integration with Drupal
To follow along with this tutorial, I recommend cloning the Git repository from this address onto your computer : https://github.com/noumecha/simple-portfolio
-- And now for our integration --
Don't worry, we'll start our first integration right away :) Please be patient ;)
In this practical example, we will integrate the first section [hero__section] found in the Git repository you cloned
- here (simple-portfolio/index.html)
- To perform an integration, we need to create the following three files:
- A PHP file: which will contain all the logic so that Drupal can understand what is being asked of it
- An .html.twig file: this will contain all the HTML for our section with Twig elements (in this case, our code for the hero section).
- A .js file: this will be used to import our SCSS and JS code, which will be converted into simple CSS and JS by a special module.
- We will also need to modify our module_un.liraries.yml file to specify where it should retrieve the js and css
Tip: it is also important to create an /icons directory in your module's tree structure so that we can visualize what our sections or teasers will look like
after integration.
First of all, we will add two special directories that will allow us to work easily
- the first directory is wbu-atomique: this is the default directory that contains all the sass logic for creating themes
- the second directory is wbu-atomique-theme: which we will need to install directly in our module_un
-- nstalling the wbu-atomique repository --
- Go to the following GitHub address and clone the repository to your machine : https://github.com/stephane888/wbu-atomique
NB: Make sure you have the git tool installed on your machine. If you don't know how to use git, here is a useful link : https://git.goffinet.org/02-les-bases-de-git.html
- Make sure your local tree looks like this for easier coding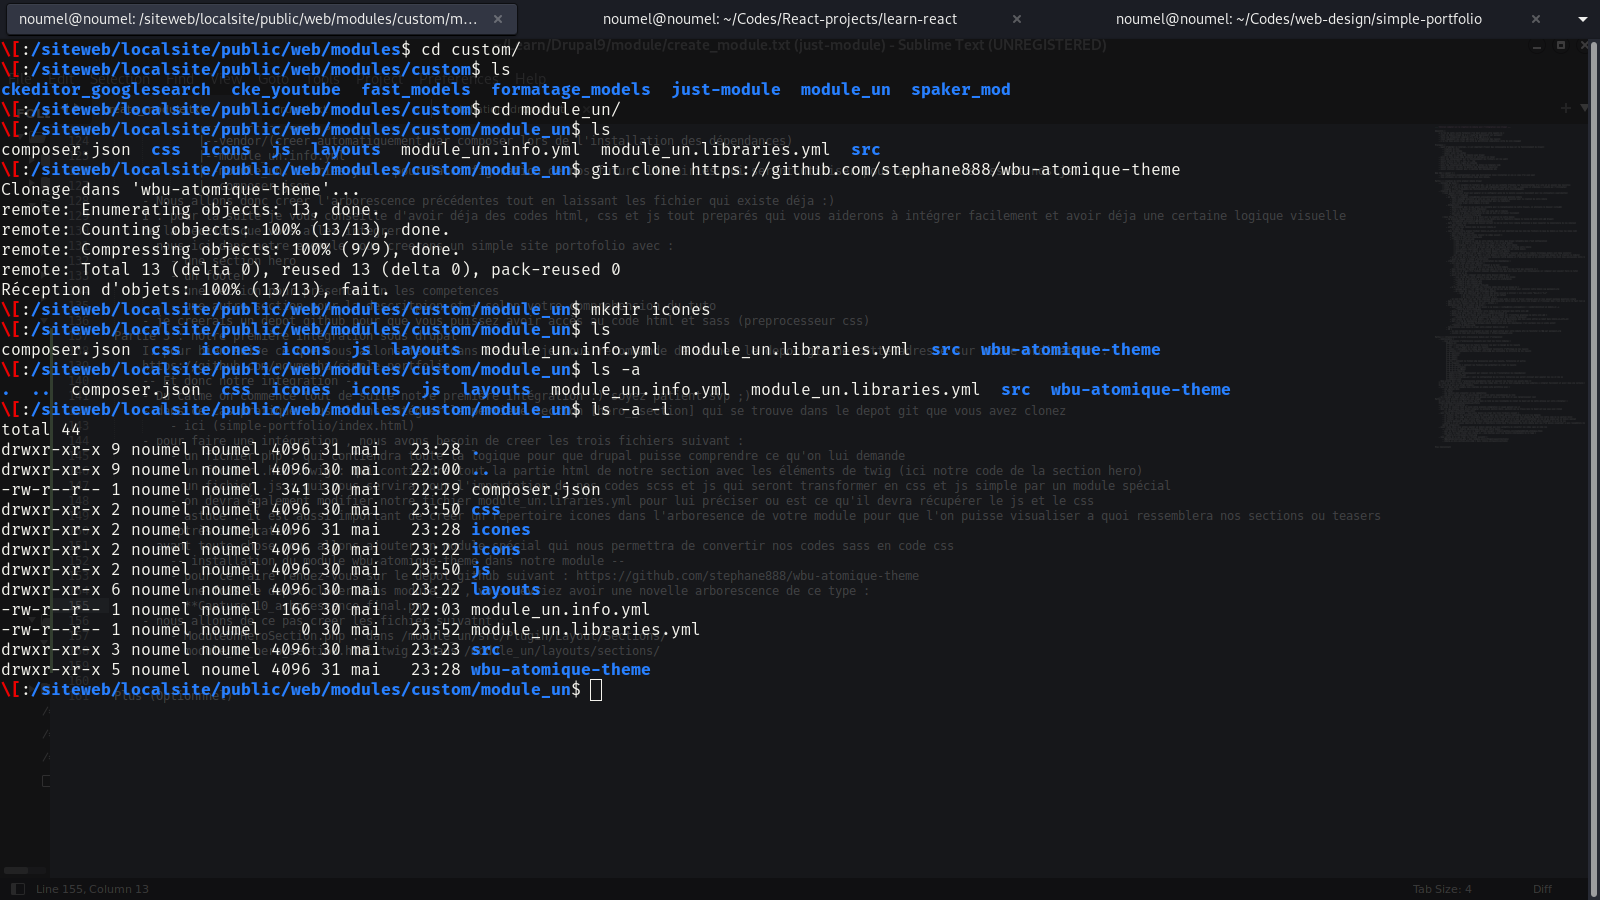
Here we can see that wbu-atomique is directly in my /siteweb/AppVuejs/wbu-atomique folder.
-- Installing the wbu-atomique-theme repository in our module --
- To do this, go to the following GitHub repository: https://github.com/stephane888/wbu-atomique-theme
-Once the repository has been cloned into module_un, you should have a new tree structure like this: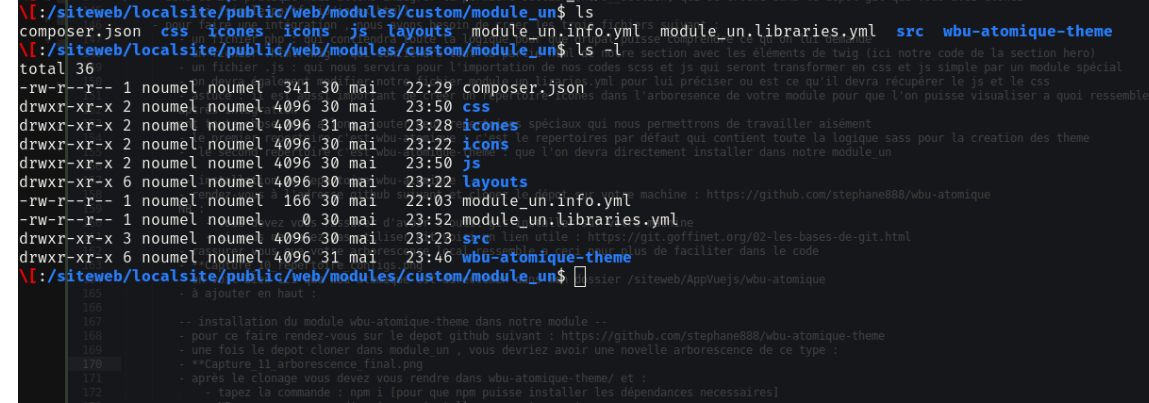
- After cloning, you need to go to wbu-atomique-theme/ and:
- Type the command: npm i [so that npm can install the necessary dependencies]
NB: Make sure you have npm installed on your system
Here is an image showing what you need to do
If an error occurs, type pluto: npm i --legacy-peers-deps
You will also need to install wbu-atomique/ as dependencies in wbu-atomique-theme. Here are the commands:
- Go to the wbu-atomique-theme folder
- Type the command: npm i /website/AppVuejs/wbu-atomique
- If an error occurs, type pluto: npm i /website/AppVuejs/wbu-atomique --legacy-peers-deps
IMPORTANT: the wbu-atomique-theme module available online contains errors, so I would advise you to use whichever version you have locally, removing the js files contained in src/ and the calls in entry.js that you do not use. This will prevent certain errors that may occur during integration.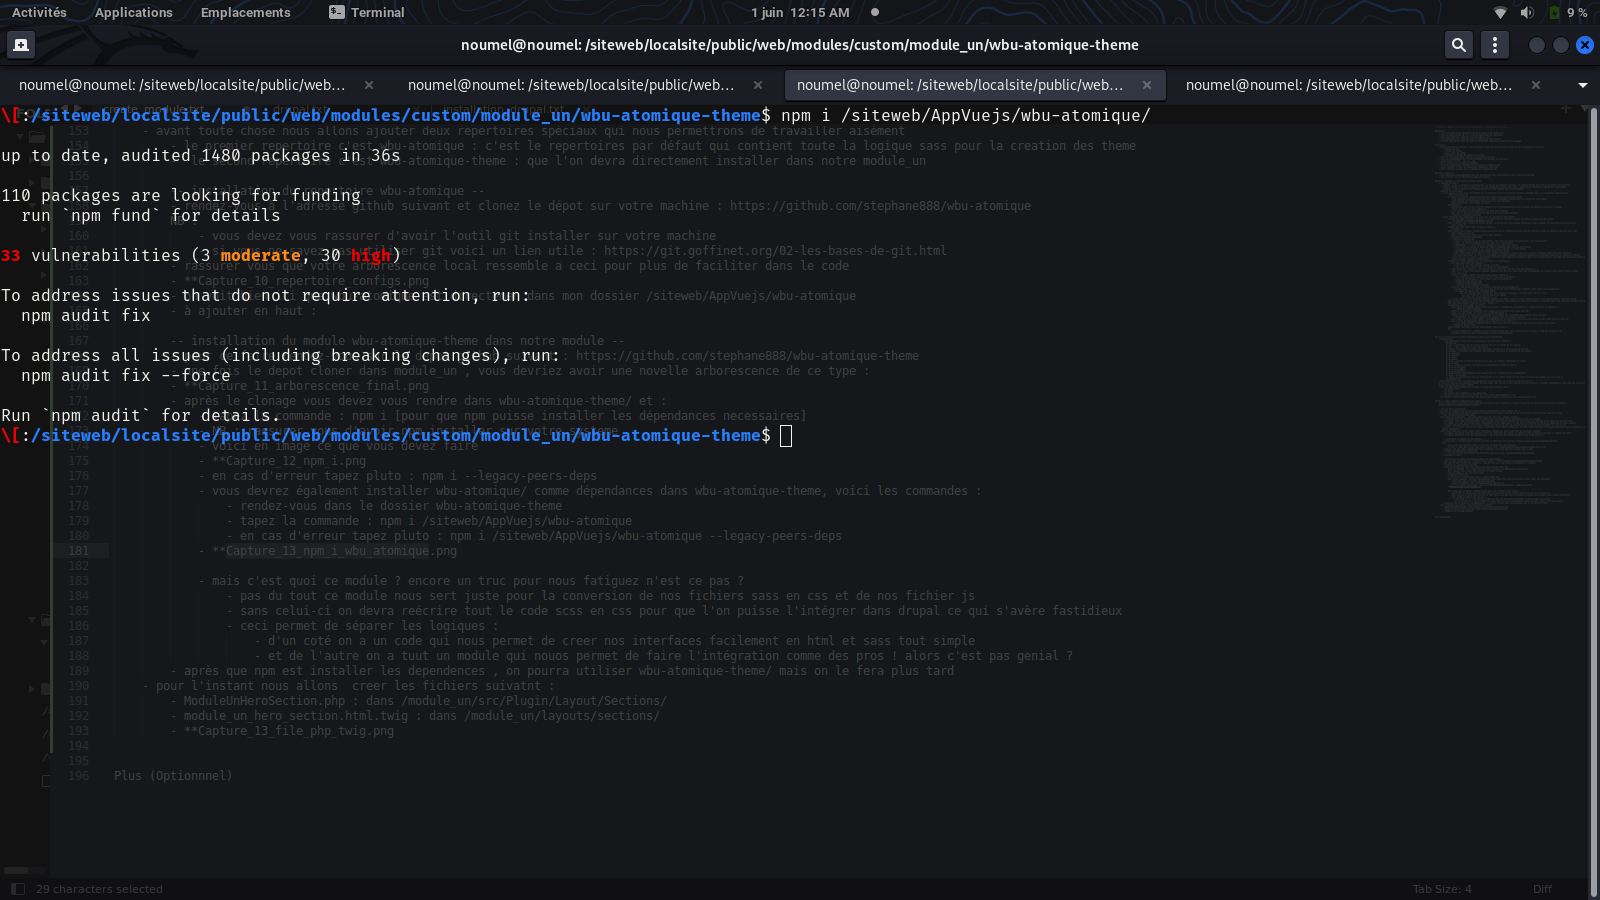
- ut what is this module? Another thing to tire us out, right?
- Not at all. This module is just used to convert our Sass files to CSS and our JS files to JavaScript.
- Without it, we would have to rewrite all the SCSS code in CSS so that we could integrate it into Drupal, which would be tedious.
- This allows us to separate the logic:
- On the one hand, we have code that allows us to easily create our interfaces in simple HTML and Sass.
- And on the other hand, we have a module that allows us to do the integration like pros! Isn't that great?
- After npm installs the dependencies, we will be able to use wbu-atomique-theme/, but we'll do that later.
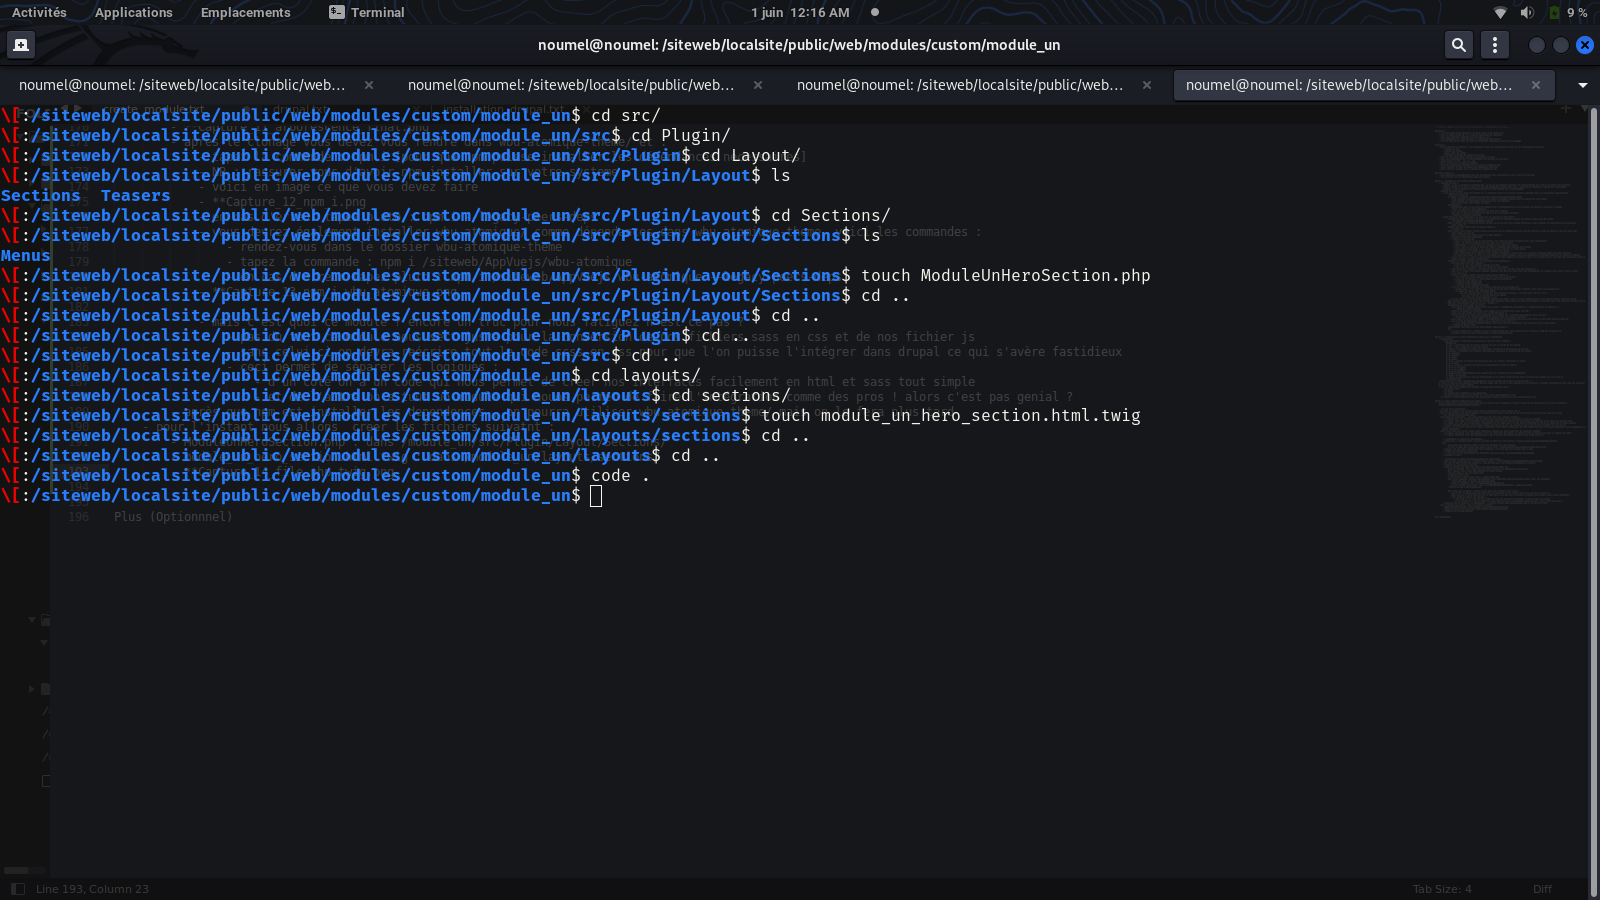
- For now, we're going to create the following files:
- ModuleUnHeroSection.php: in /module_un/src/Plugin/Layout/Sections/
-module_un_hero_section.html.twig: in /module_un/layouts/sections/
- Once these initial steps have been completed, we can move on to the code writing phase.
-- Coding --
- We start by modifying the php file -
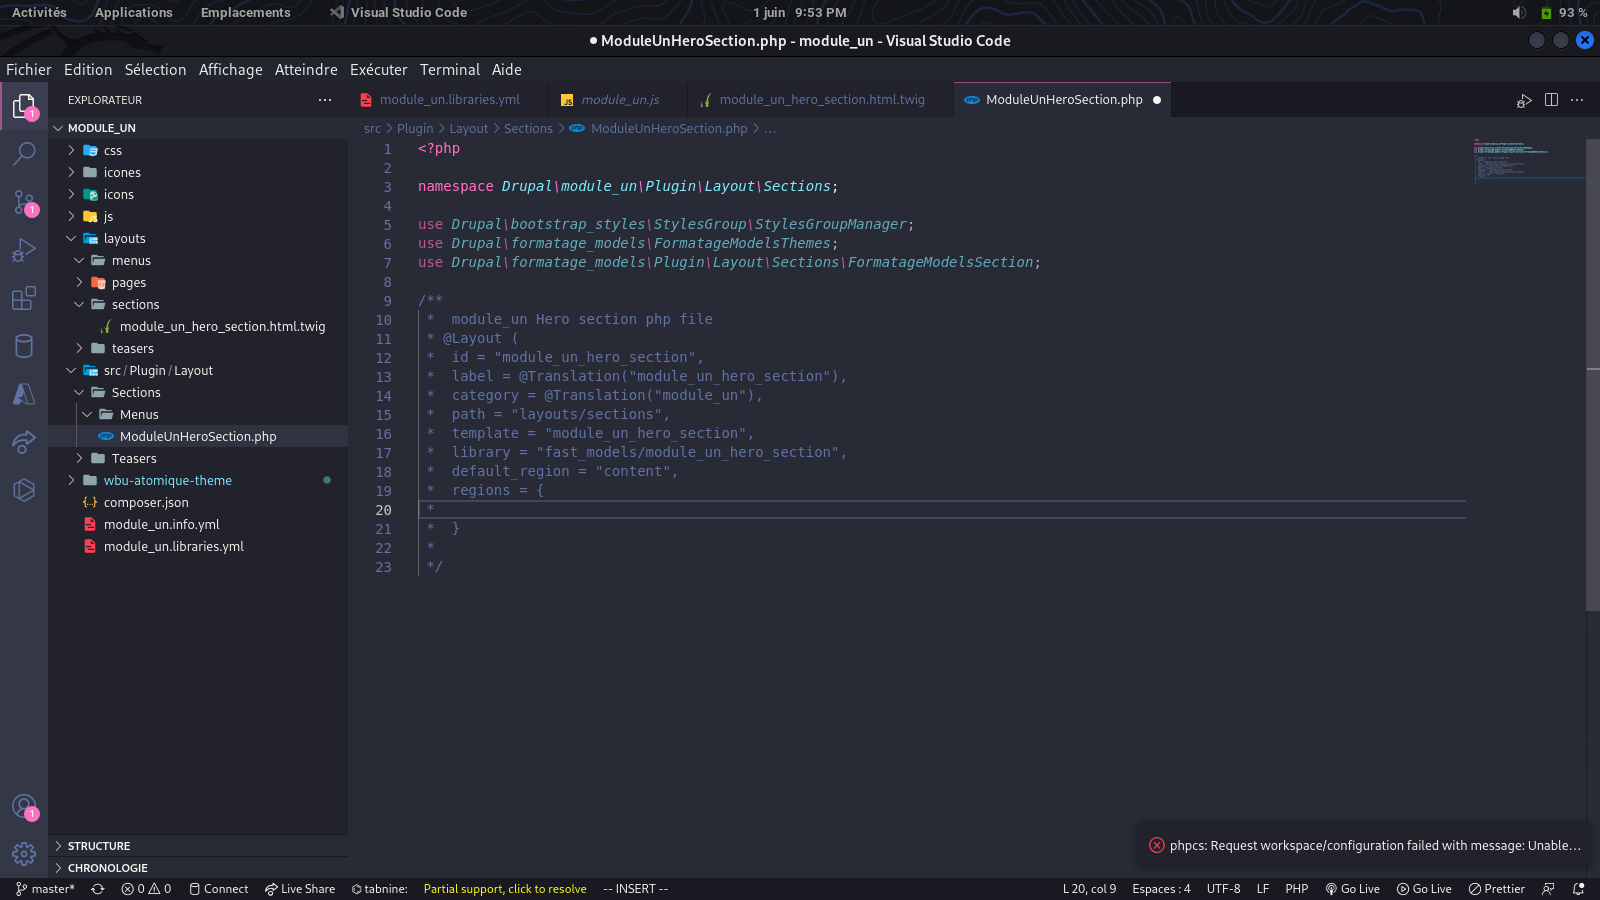
In the previous screenshot, we added:
- a namespace: so that Drupal always goes to our module when it needs to integrate our section
- we call a few classes that are important for our PHP code to work properly, since we will be calling other functions within it
- you will notice that we also called classes from formatages_models
- :) : let's not forget that our module is based on formatages_models
- finally, we have commented lines, which are the most important for the proper functioning of our section
- id: allows us to give our section a unique identifier so that Drupal can recognize it uniquely
- label: this is the name that will be displayed when we want to add our section to a content type (we'll see this later)
- category: specifies which category our module belongs to
- path: defines the path to be taken into account for the twig file (the template, if you like)
- template: this is the name of our twig file associated with our section
- library: defines the name of the library that we will have created in our module_un.liraries.yml file
-- default_region: this is the default region for our section
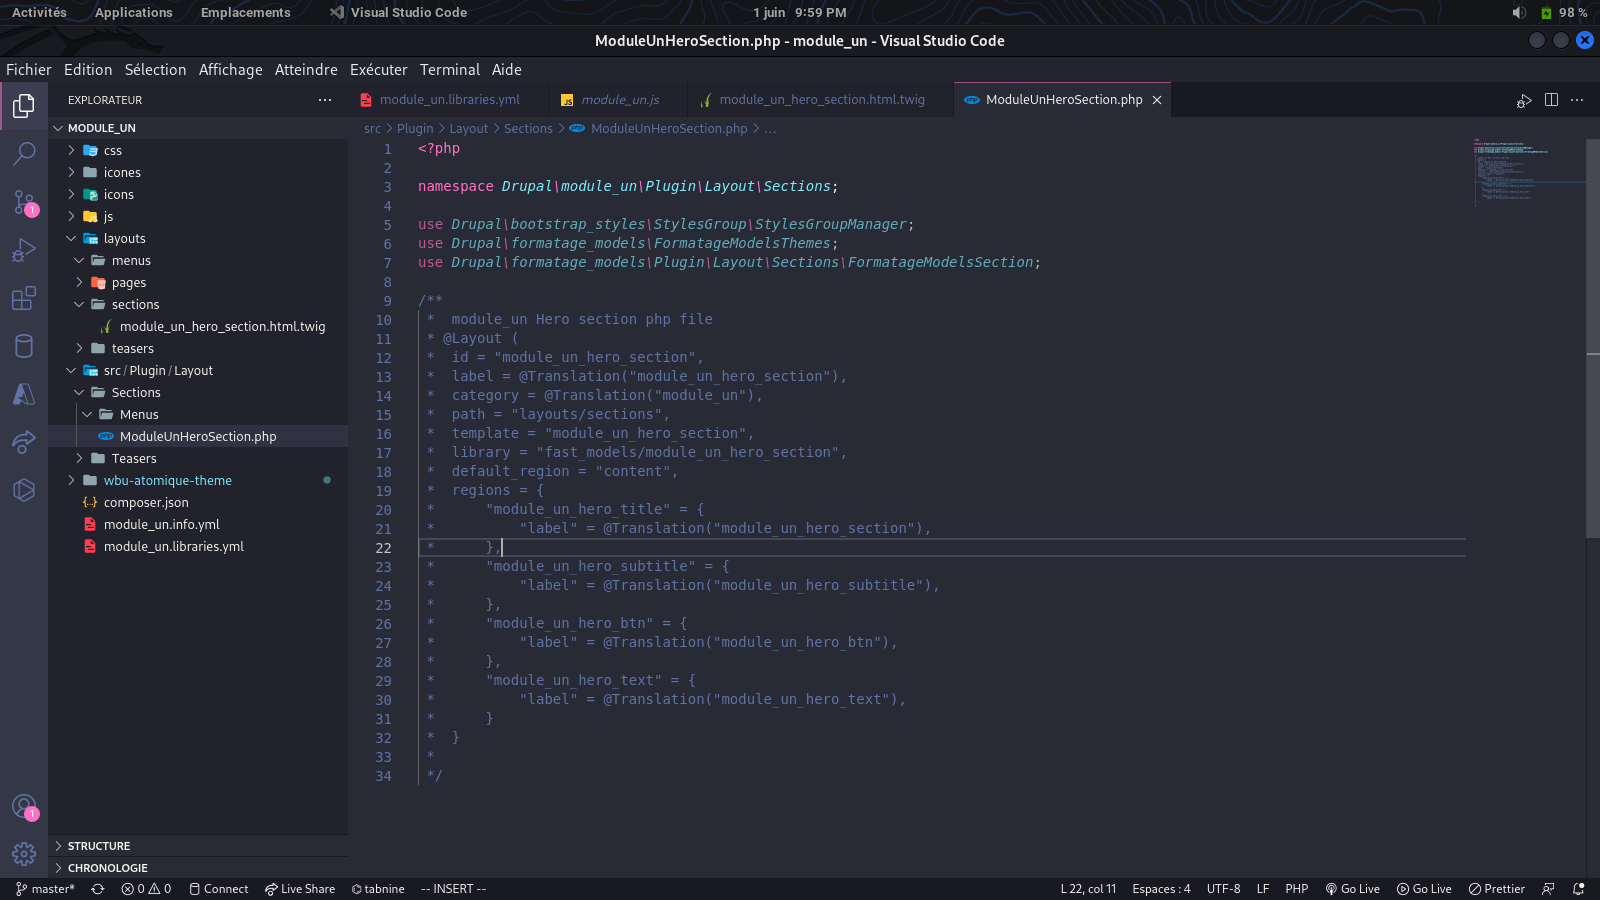
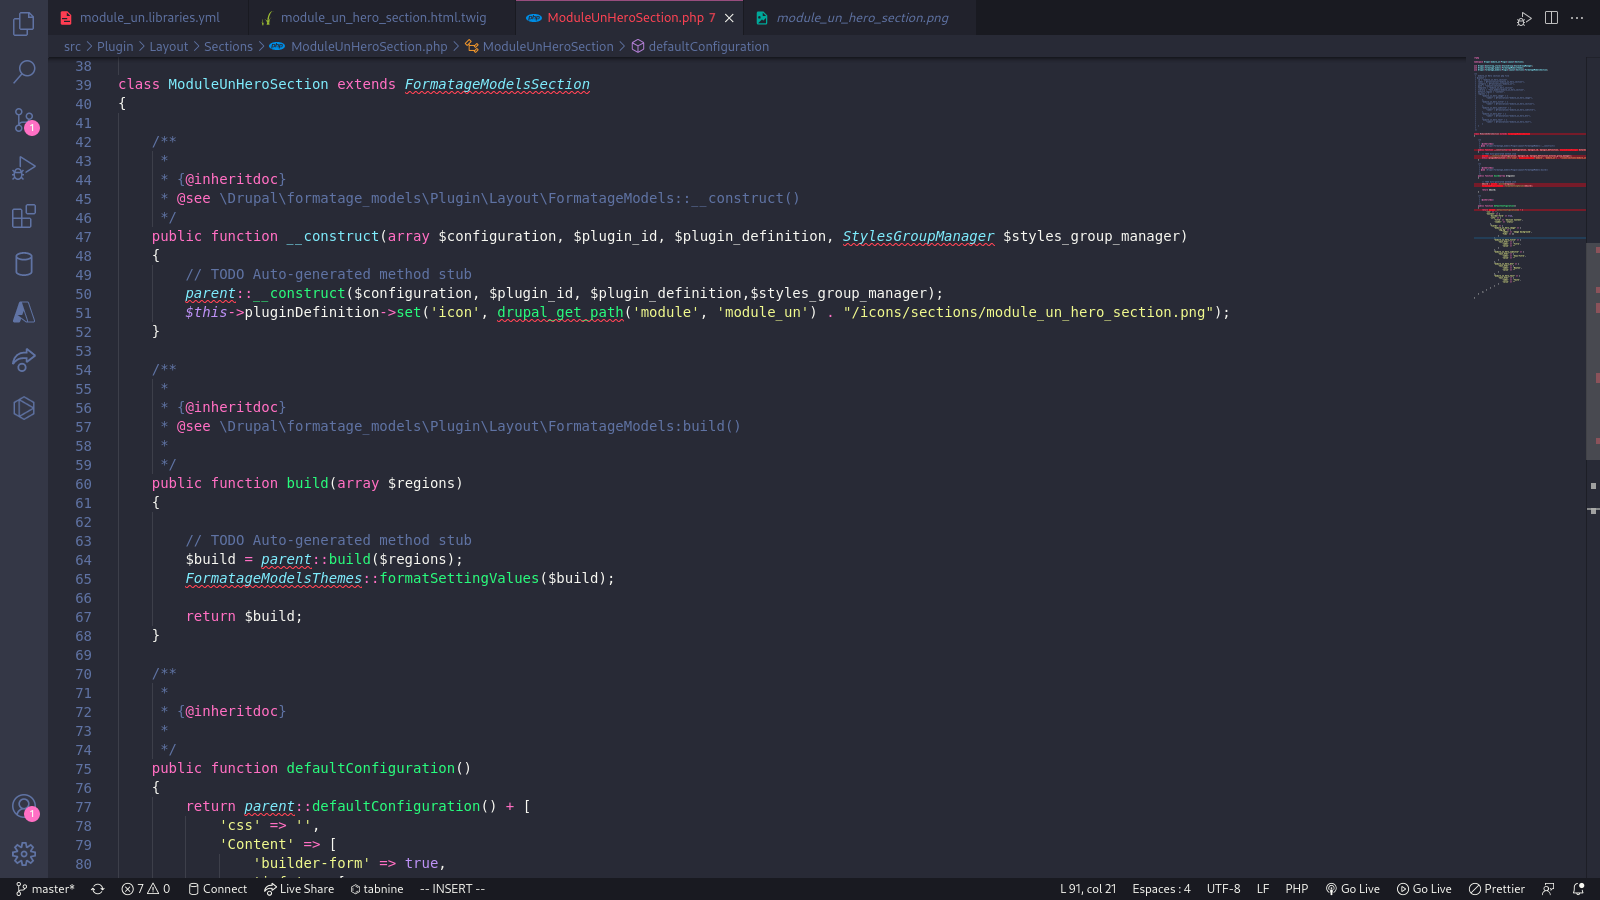
- regions: this is a bit tricky; it is actually the part that will allow us to define our regions
* if you have already worked with blocks, you are probably familiar with regions
* regions are the elements that allow us to add blocks to our section
* for example, on our hero section, if we want to integrate:
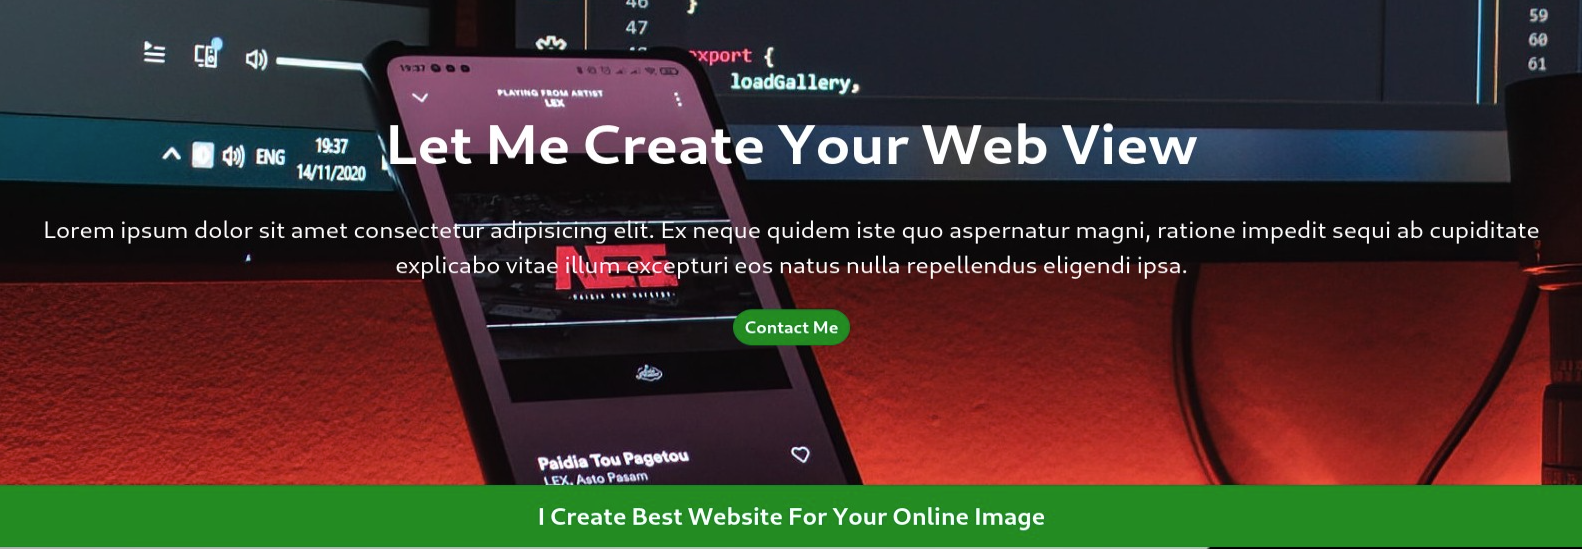
- We see that we need to create four regions
: one for the title, one for the subtitle, one for the button, and one for the text at the bottom.
* We will therefore need to create four regions, hence the revised code below:
- At this point, we're good to go. All we have to do now is create our class and add specific functions to it to make a pretty cool section.
- Note: You'll notice that I use fairly consistent naming conventions. This isn't just a personal preference; it's important to define your naming conventions clearly to avoid errors.
- So you don't forget, I suggest you create the following files:
- For the library: we'll call it module_un_hero_section
- Here's a screenshot of the library: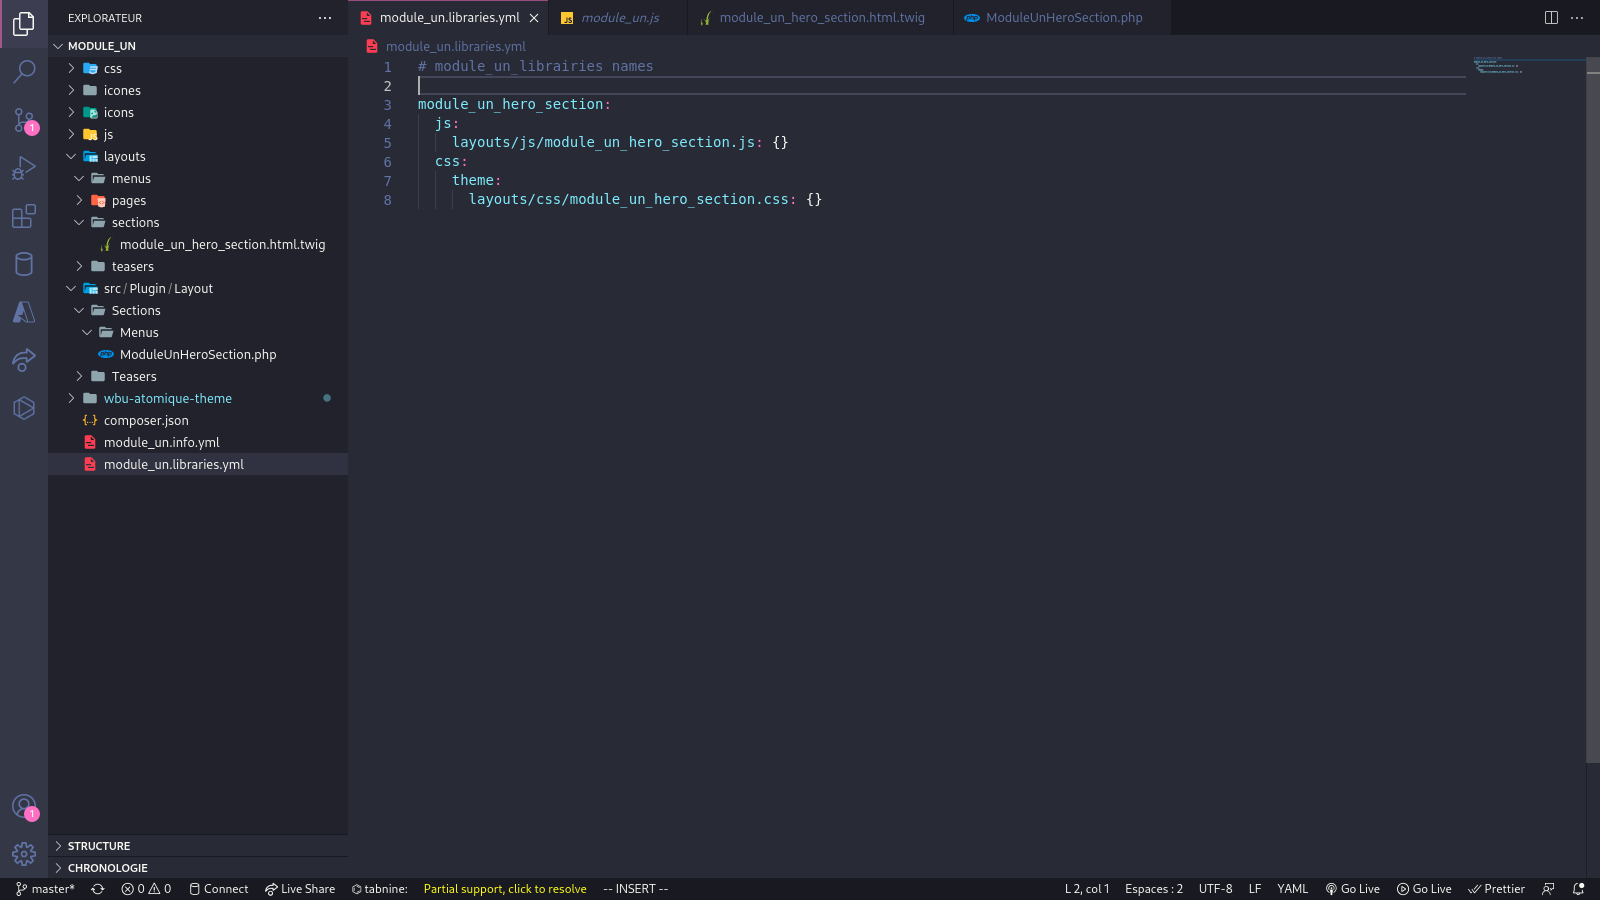
- The template: we had already created it, so we don't have to worry about that one.
- Enough chatter, let's continue with our PHP file.
- Here is an image of the code to insert:
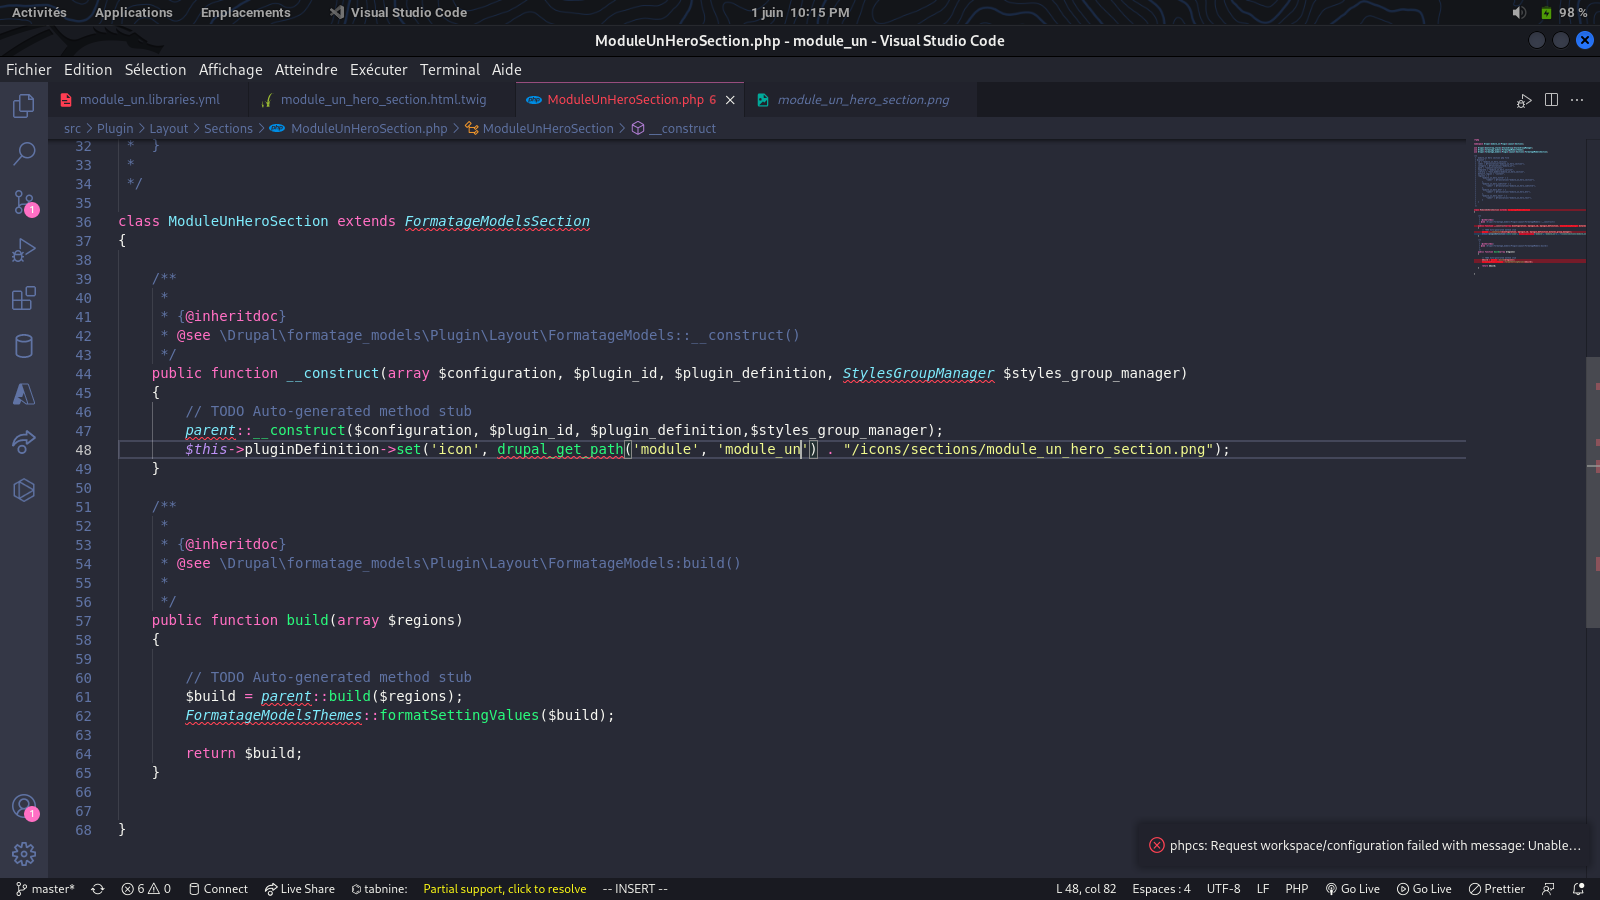
- The builder allows us to add default elements for configuring our sections.
- Here, for example, we have added an icon for our section.
- Remember, I mentioned earlier how important it is to have an icon so we know what our section will look like.
- Here, the path where our icons are located is: /icons/sections/module_un_hero_section.png (at the root of our module, of course)
- The build function is a function associated with Drupal. It will allow us to render several elements such as regions and many others. Visit the Drupal documentation for more information.
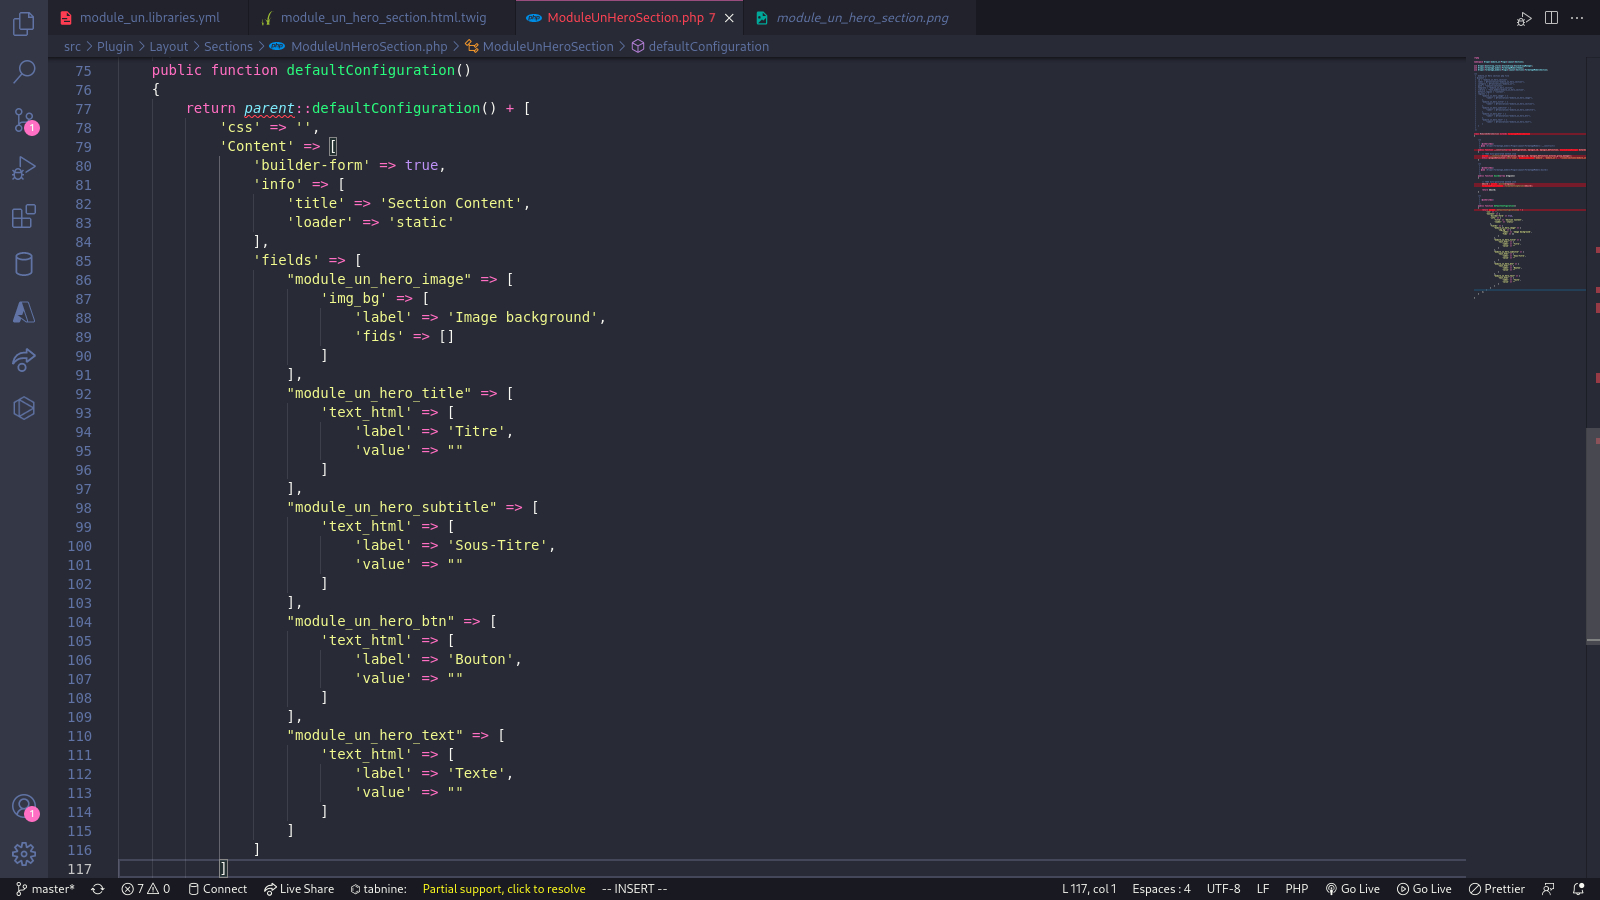
- Finally, we will add one last function to our code so that we can have a configuration form when integrating our section into Drupal.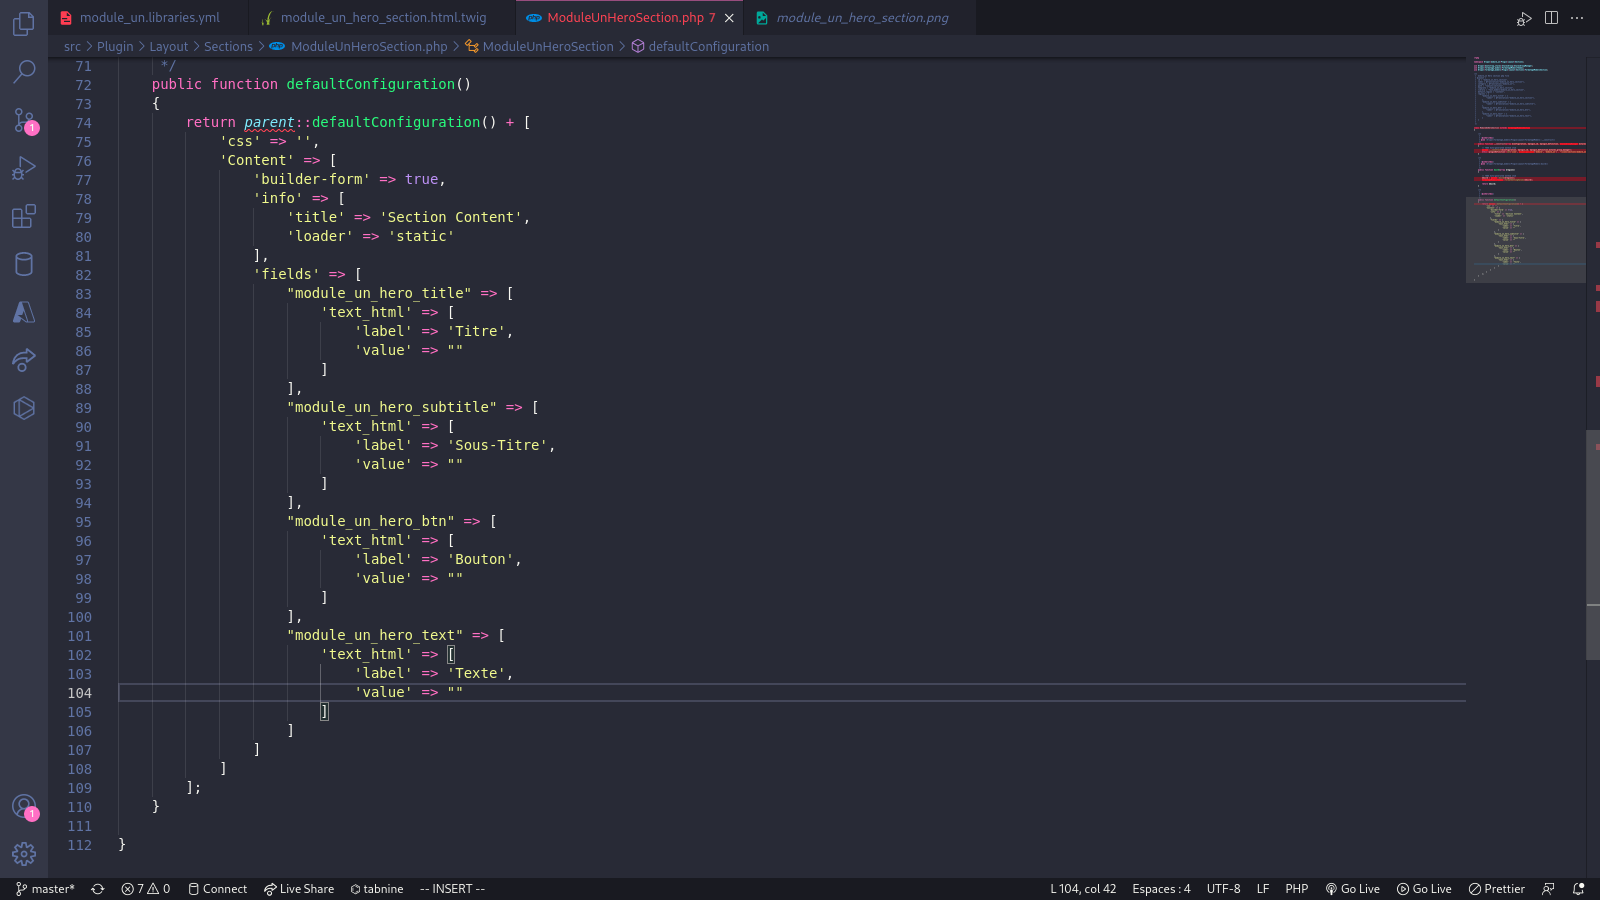
- This function allows you to create a form and manage it through the graphical interface.
- ‘css’: allows you to define a default CSS (optional).
- ‘Content’: corresponds to a key that will allow us to manage specific content; we could have
called it hero_section if we wanted to; we just need it to define the rest
- ‘builder_form’: tells Drupal to create a configuration form
- ‘info’: allows us to give:
* a title for our form: ‘here we have put Section Content’ you can put whatever you like
* ‘loader’: to tell Drupal how it should load content [here it is static]
- ‘fields’: allows us to define the different fields of our form
* you will notice that each field we create actually corresponds to a region we created
earlier. It is important to do this because it allows us to directly modify
the value of the region in the form. It is very important that the names comply with the
regions
- well, our section needs a background image. How are we going to integrate that?
- As you've noticed, you're geniuses. Indeed, we need to be able to modify the background
from our form
- The user won't necessarily want to use our default image. So how do we do that?
- First, in our regions, we're going to add a new region: I'll call it
module_un_hero_image.
- Then, in the fields, we'll add this region with the following code:
'module_une_hero_image' => [
  'img_bg' => [
    'label' => 'Image background hero',
    'fids' => []
  ]
],
- This will allow us to have a form with a button for selecting background images.
- In the end, your PHP code should look like this: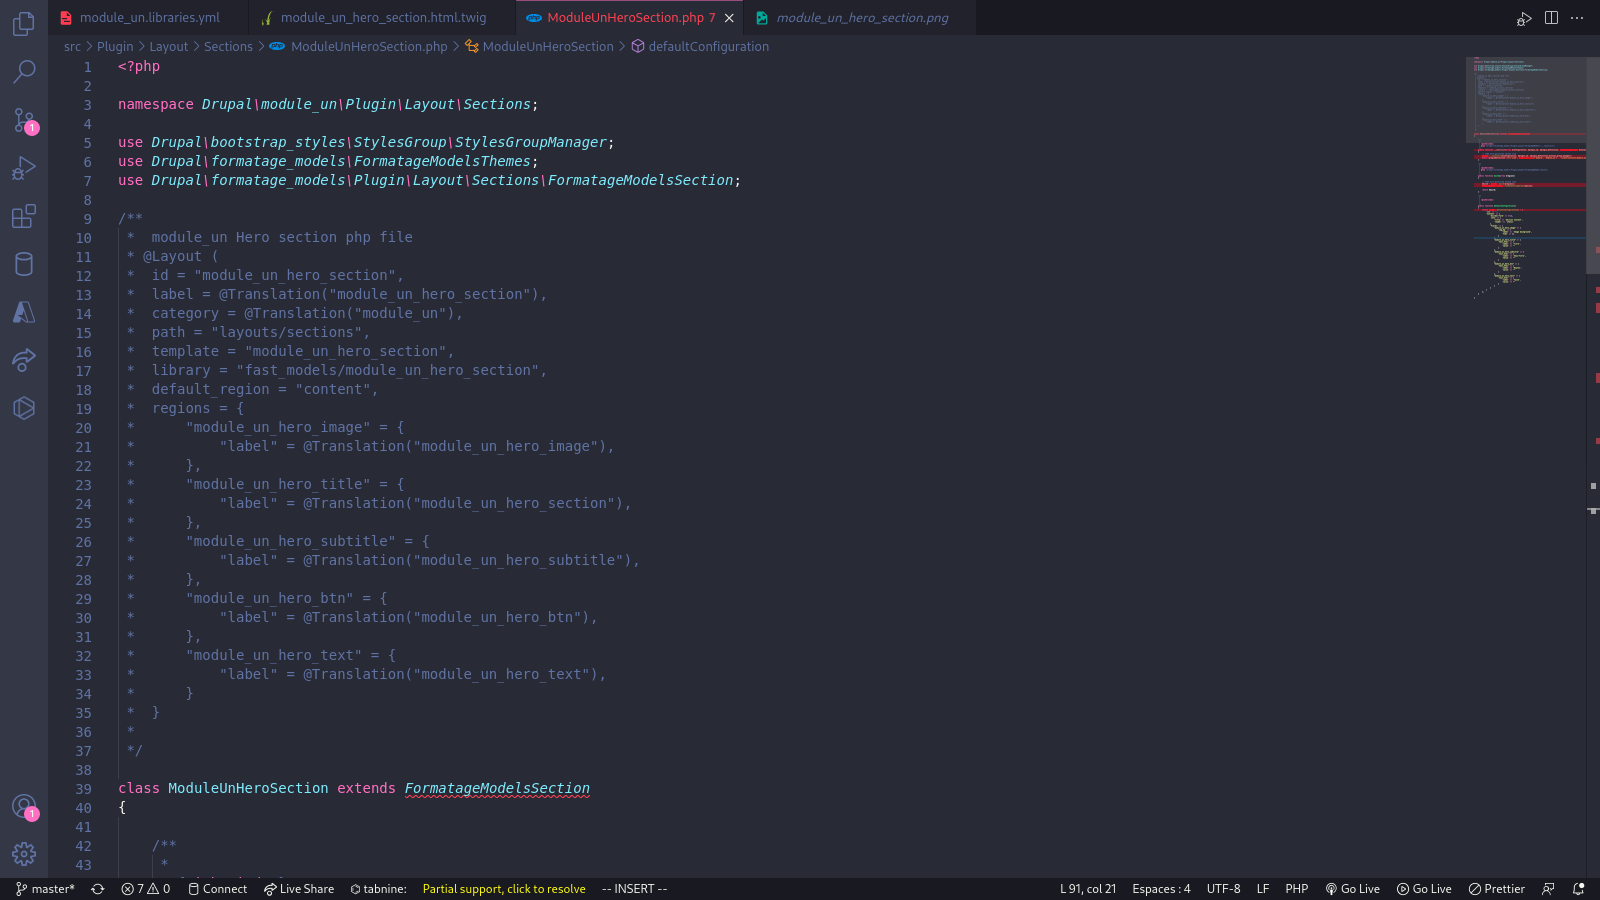
- the template (file module_un_hero_section.html.twig) -
- if you have cloned the project's git repository https://github.com/noumecha/simple-portfolio simple-portfolio
- You should have an index.html file. Copy the entire hero__section section and paste it into the module_un_hero_section.html.twig file.
- Before moving on to gradually modifying the Twig template, you will need to insert the following code snippets as shown in the image: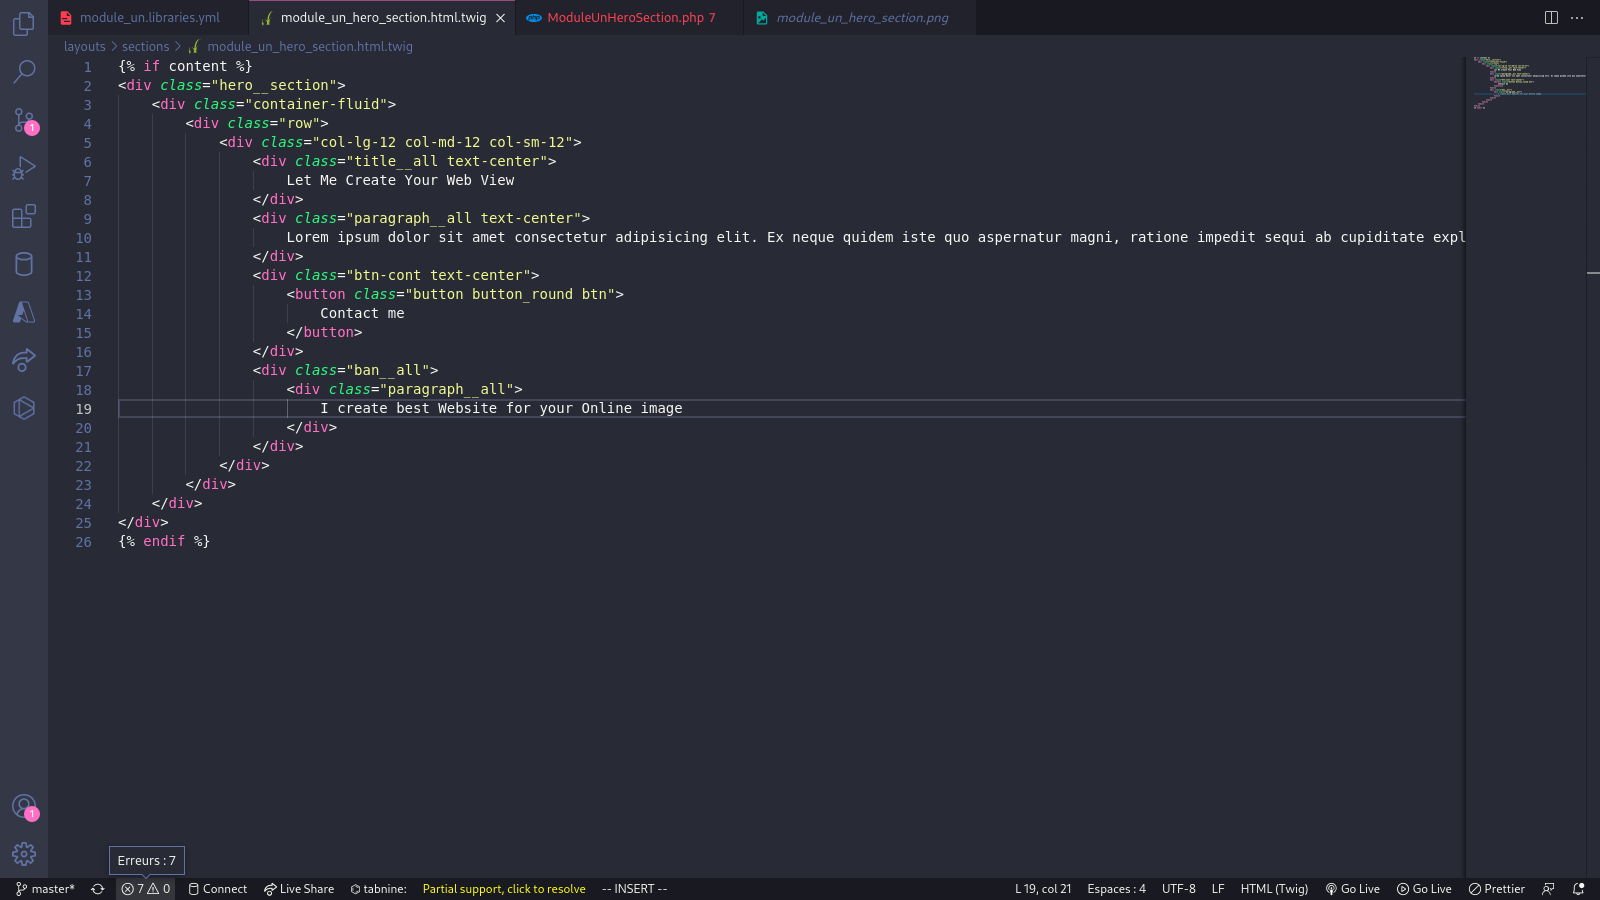
- First, we will modify the code and then explain each detail step by step.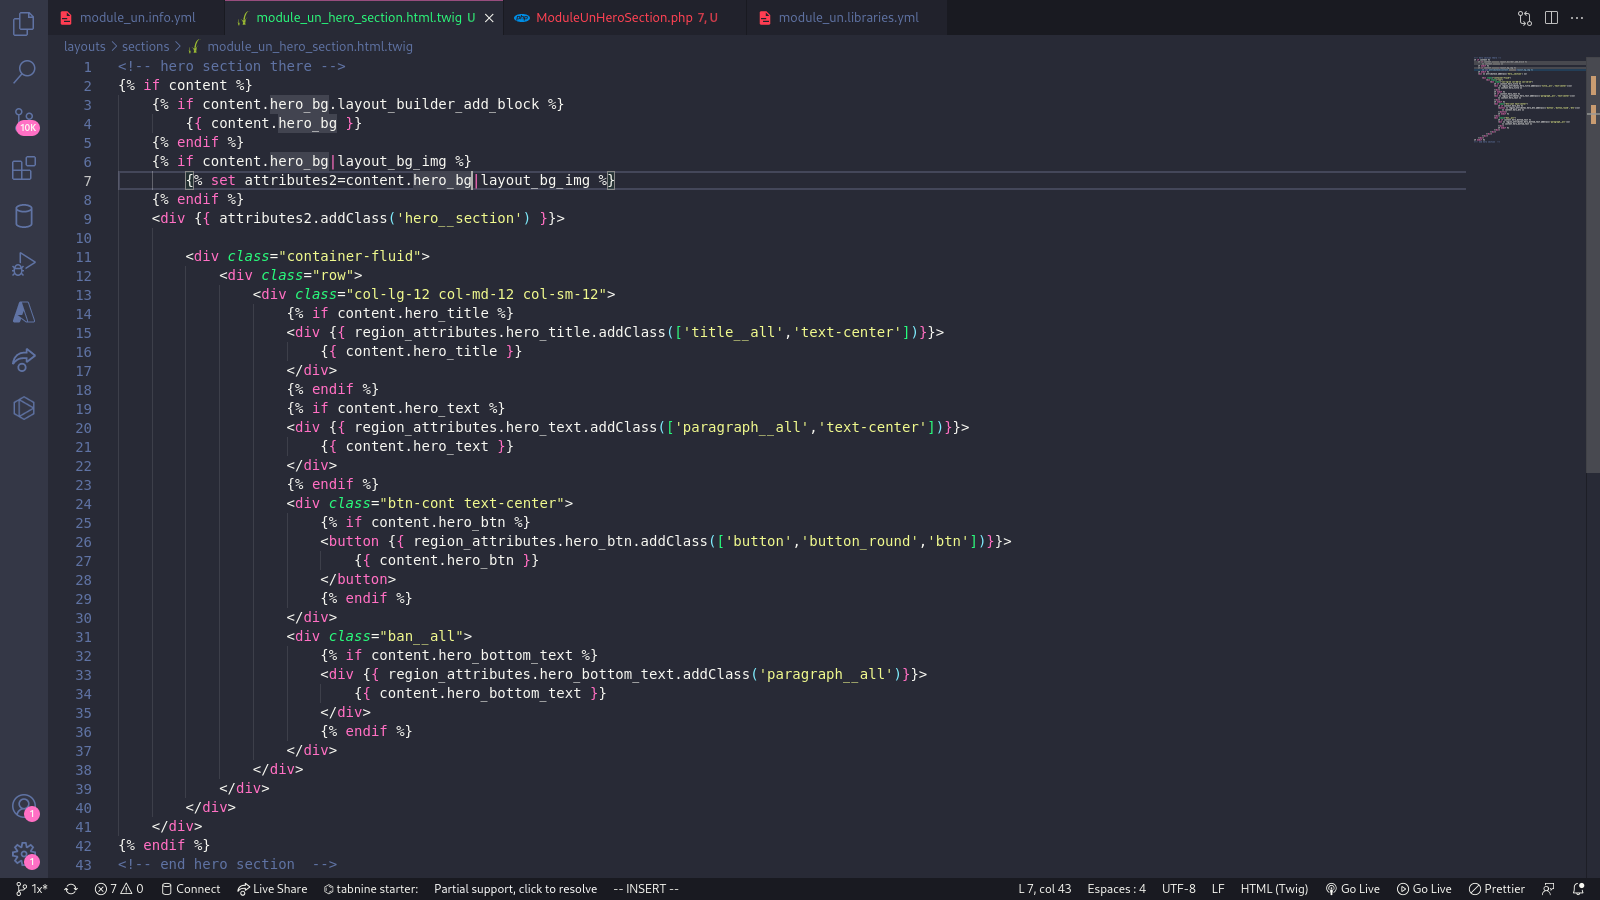
-- Explanations about the twig file
- the first part: {% if conent %} [allows us to check that what follows is not empty so as not to return empty content to the screen]
- {{ attributes.addClass(‘’) }}: adds the very first class of our template. This is important for the hierarchy of the different regions and allows us to override the classes
in the form that appears when we want to modify a region during its integration
- {% if content.region_name %}: [like if content, this allows you to check and avoid returning an empty element; if there is no content, nothing will be returned]
- {{ region_attributes.region_name }}: allows you to add classes to regions. It works in the same way as attributes.addClass(), but this time for regions.
- {{ content.region_name }}: allows you to load the content found in the PHP file and also allows you to add certain other blocks to our regions during integration; it is very useful
-- And what does the first part mean?
{% if content.hero_bg.layout_builder_add_block %}
	{{ content.hero_bg }}
{% endif %}
{% if content.hero_bg|layout_bg_img %}
	{% set attributes2=content.hero_bg|layout_bg_img %}
{% endif %}
- Of course, I hadn't forgotten: this part allows us to add a background-image attribute directly in the regions that will carry the attributes2 marker
- You will notice that this refers directly to our hero_bg regions that we created in our PHP file.
-- But where is the default content that was there? --
- Don't worry: all the content that was present in each region has been placed in value at the PHP level.
- For example, for {{ content.hero_title }}, its default value can be found at the PHP level in “value,” which corresponds to the hero_title region.
- Add scss
- Step 1: Go to the file wbu-atomique-theme/entry.js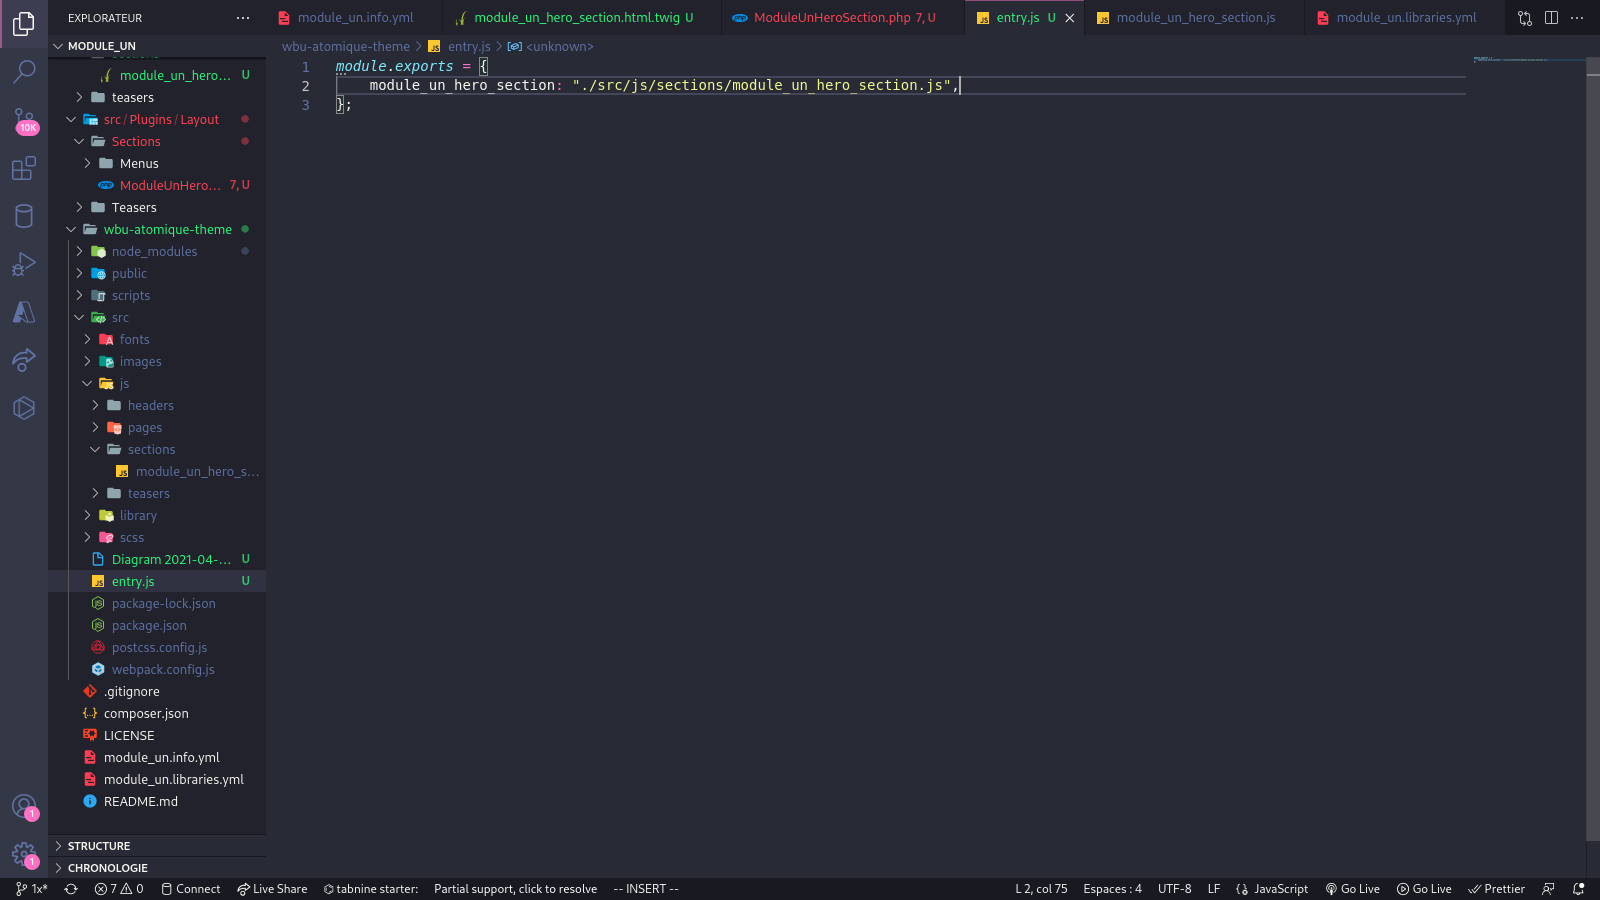
- This code allows us to define an entry to specify to npm where to find the js file to use
- Step 2: This time, we go to wbu-atomique-theme/src/js
- and create the file called in entry.js as follows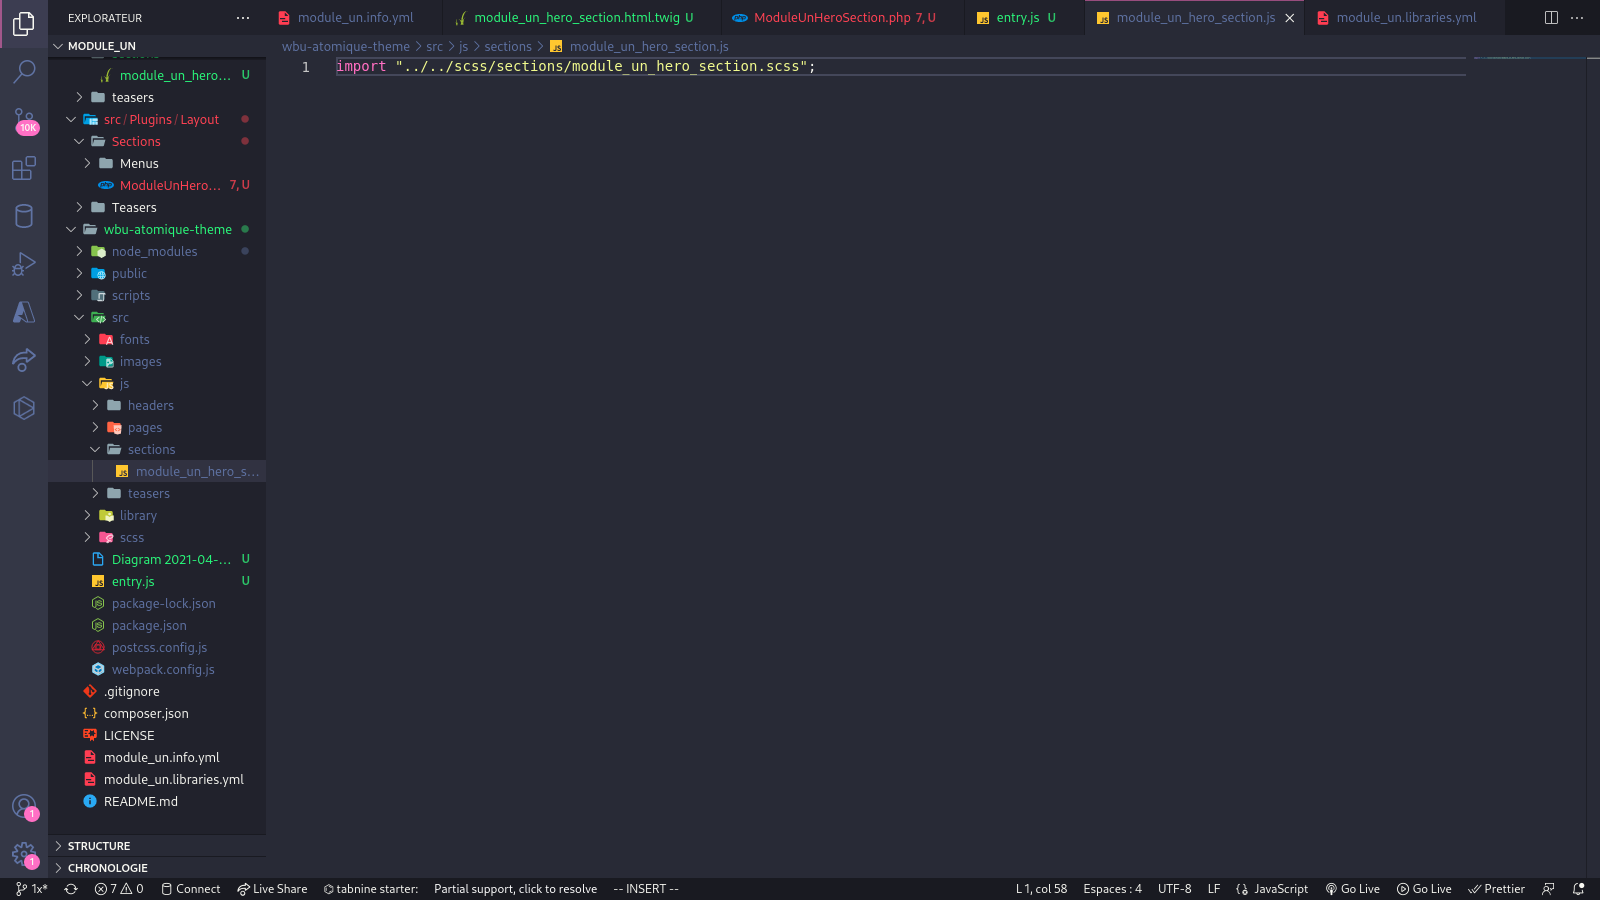
- Next, go to wbu-atomique-theme/scss/sections/ and create the file corresponding to our scss as follows, then add our scss from our simple-portfolio repository:
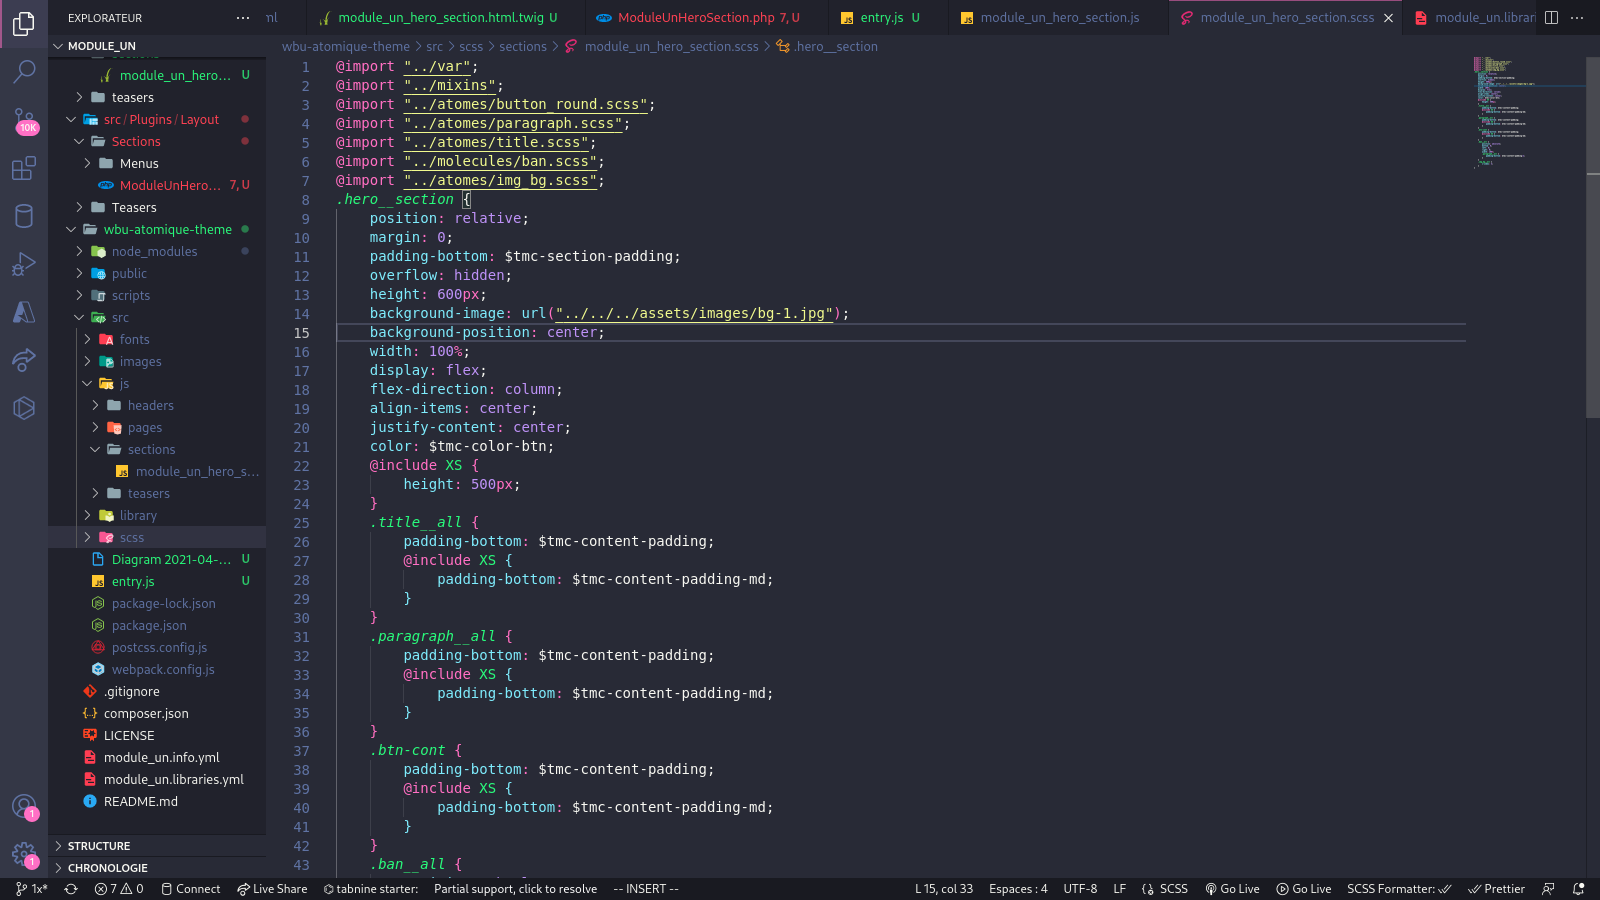
- For the sake of it, you will add the atoms and files necessary for Sass to easily retrieve the additional SCSS files required for the hero section (thanks to atomic design).
- It will be a little complex, but you will do it this way for now, and in the future, you will only have to create your SCSS in wbu-atomique and call them in your module directly thanks to @stephane888
- And for that, you will need to install wbu-atomique as a dependency in wbu-atomique-theme.
- IMPORTANT: in our enterprise framework, instead of creating the scss file, we will use the styles imported into the js file directly, like this
- for example, for our module_un_hero_section.js code:
- instead of import “../../scss/sections/module_un_hero_section.scss”;
- we will instead use import “@stephane888/scss/path_to_file” {remember, it will simply give preference to our wbu-atomique that we have locally and that we have added as a dependency to our project}
- After this, we will open a terminal and go to wbu-atomique-theme/ and type the following command:
npm run Dev
- This will allow webpack to create and generate the necessary CSS files from our SCSS file and place them in our module at the layouts/css or layouts/js level for JS files.
- If you are using wbu-atomique as a dependency for your project, you will not need to enter this command.
-- We have just finished our first integration -- Now it's time to test the rendering:
- You must clear your cache and go to your site to configure a new content type to which you can add the layout you just created.
- I will leave you to configure and modify your section as you wish.